Home Radon Testing Guide: Kit Placement, Results, and Mitigation
Smartor 편집팀
September 16, 2026

Radon has no color or smell, so you cannot tell whether it is in your home without measuring it. A newer home is not automatically protected, a house without a basement is not exempt, and a neighbor’s low result does not predict yours. Testing matters even more when you plan to use a basement as a bedroom or office, buy or sell a home, or complete work that changes the foundation, windows, insulation, or ventilation.
The Centers for Disease Control and Prevention (CDC) describes short-term tests as measurements lasting 2 to 90 days and long-term tests as measurements lasting more than 90 days. A short-term test provides a relatively quick snapshot. A long-term test captures more seasonal and day-to-day variation and is more representative of an annual average. The U.S. Environmental Protection Agency (EPA) recommends fixing a home at 4 picocuries per liter (pCi/L) or higher and considering steps to reduce radon between 2 and 4 pCi/L. There is no known completely safe level, so the result should guide a next step rather than be treated as a simple pass-or-fail grade.
This article provides general U.S. home-maintenance and radon information. It does not diagnose an individual health risk or replace medical, real-estate, legal, or engineering advice. Discuss health concerns with a qualified health professional and check current state and local rules for rental or transaction obligations. High results, confirmation testing, and mitigation work are best handled with a properly credentialed professional recognized in your area.
Radon is a naturally occurring radioactive gas released from soil, rock, and groundwater. Pressure differences between the soil under a house and the indoor space can draw radon through foundation cracks, floor-to-wall joints, utility penetrations, sump openings, and crawl spaces. Groundwater can also be a route in some homes with private wells, but testing the indoor air is generally the first step.
Two similar homes can produce different readings because their foundations, soil, drainage, ventilation, heating patterns, and weather conditions differ. EPA radon-zone maps show regional potential; they do not predict the result at a specific address. Do not assume that your home is clear because the county is shown as lower potential, or that it must be high because a neighbor had a high result. Test the space where your household actually lives.
Radon exposure is not something you identify through an immediate odor, headache, or other warning sign. The CDC explains that long-term exposure to elevated radon can raise lung-cancer risk and identifies radon as the second leading cause of lung-cancer deaths in the United States. Current or former smoking can further increase risk. A high home test is not a diagnosis, however. Instead of removing the test, panicking, or leaving windows open indefinitely, validate the measurement and choose a durable reduction strategy.
Depending on the product, a short-term kit measures radon for 2 to 90 days. Many use a passive collector that you send to a designated laboratory. Read the package carefully to learn whether laboratory analysis and return shipping are included. A short-term kit is a reasonable first step if the home has never been tested or if you want an initial result before committing to a longer measurement.
Short-term results can be influenced by weather and building operation. Record major storms, unusually strong wind, construction that required doors or windows to stay open, or a major change in heating and cooling. If you could not maintain the conditions required by the instructions, do not force an interpretation. Repeat the test correctly or arrange a professional measurement.
A long-term device stays in place for more than 90 days, capturing more of the home’s seasonal changes and normal ventilation patterns. If you own the home and do not face a transaction deadline, this type of result can better represent the annual average. It may also help when a valid short-term result falls near a decision point, such as the 2-to-4 pCi/L range.
An electronic continuous radon monitor can show changes over time and may help you observe patterns related to HVAC use, open doors, or weather. Do not judge the whole home from a single hourly reading on a consumer display. Follow the manufacturer’s placement, warm-up, calibration, and measurement-period directions. For a real-estate transaction or repeatedly high readings, consider an independent credentialed tester.
EPA directs homeowners to state radon programs for help finding test kits and qualified measurement or mitigation providers. Do not rely only on an advertisement that says “certified.” Verify any license required by the state or a credential from a national proficiency program recognized by EPA.
Before ordering a kit, sketch the home’s lower levels and identify the rooms people actually use. This small step prevents many placement errors. Record:
If you also want to document air leaks and ventilation, use the fall home energy audit checklist to inspect doors, windows, attic areas, and HVAC airflow. Air sealing can change pressure and airflow, so test before a major project to establish a baseline and test again after the work is complete.
Example: Imagine a basement with laundry and a boiler on one side and a home office used every weekday on the other. Do not put the kit on the floor beside the boiler or on top of the washing machine. Place it on a stable table or shelf in the office, away from the window, door, and vent, at the height allowed by its instructions. Take one wide photo showing the room and device location, then create reminders for both the stop time and the shipping deadline.
One kit may not represent every area of a large or structurally divided house. Ask your state radon program or a measurement professional how many locations are appropriate if the home has separate foundation zones, a basement plus a slab addition, or several occupied rooms on the lowest level. In an apartment or condominium, the starting point is generally the lowest occupied level inside your unit, but you should also review building policies and any plan for common areas.
Do not simply toss a consumer kit into a crawl space. That may measure the foundation cavity instead of household exposure. Test the occupied area; if results are high, a mitigation professional can evaluate the entry routes and pressure beneath each foundation section. Boiler rooms, humid bathrooms, kitchens, and locations beside a clothes dryer are also poor substitutes for a representative living space.
A report normally shows an average concentration in pCi/L, the measurement period, and laboratory information. Before focusing on the number, decide whether the test was valid. Was the kit exposed for the correct period? Were start and stop times accurate? Was it returned promptly? Did anyone leave windows open for long periods or perform construction? A low number from an invalid test does not provide reliable reassurance, and an invalid high number should not be the sole basis for signing a mitigation contract.
EPA and CDC guidance supports taking action to reduce radon at this level. Confirm that the test procedure was sound, then contact a qualified measurement or mitigation professional listed through your state program. A follow-up measurement may be appropriate depending on the situation, but do not leave a credible high result unresolved. Ask multiple providers to evaluate the same conditions and deliver a written scope that includes post-installation testing.
EPA recommends considering ways to reduce radon in this range as well. A long-term test can provide a better estimate of annual exposure, or a professional can discuss practical reduction options for the home’s foundation and living areas. Smoking history or substantial time spent on the lowest floor may be reasons to discuss personal concerns with a health professional, but a home reading alone cannot calculate an individual diagnosis.
A lower result is not a permanent exemption from future testing. CDC recommends testing when buying or selling, before and after renovations, and before someone begins spending more time on a lower level. Test again after foundation repair, sump work, major HVAC changes, window and insulation projects, or converting a basement into a bedroom. Follow any retesting schedule recommended by your state radon program.
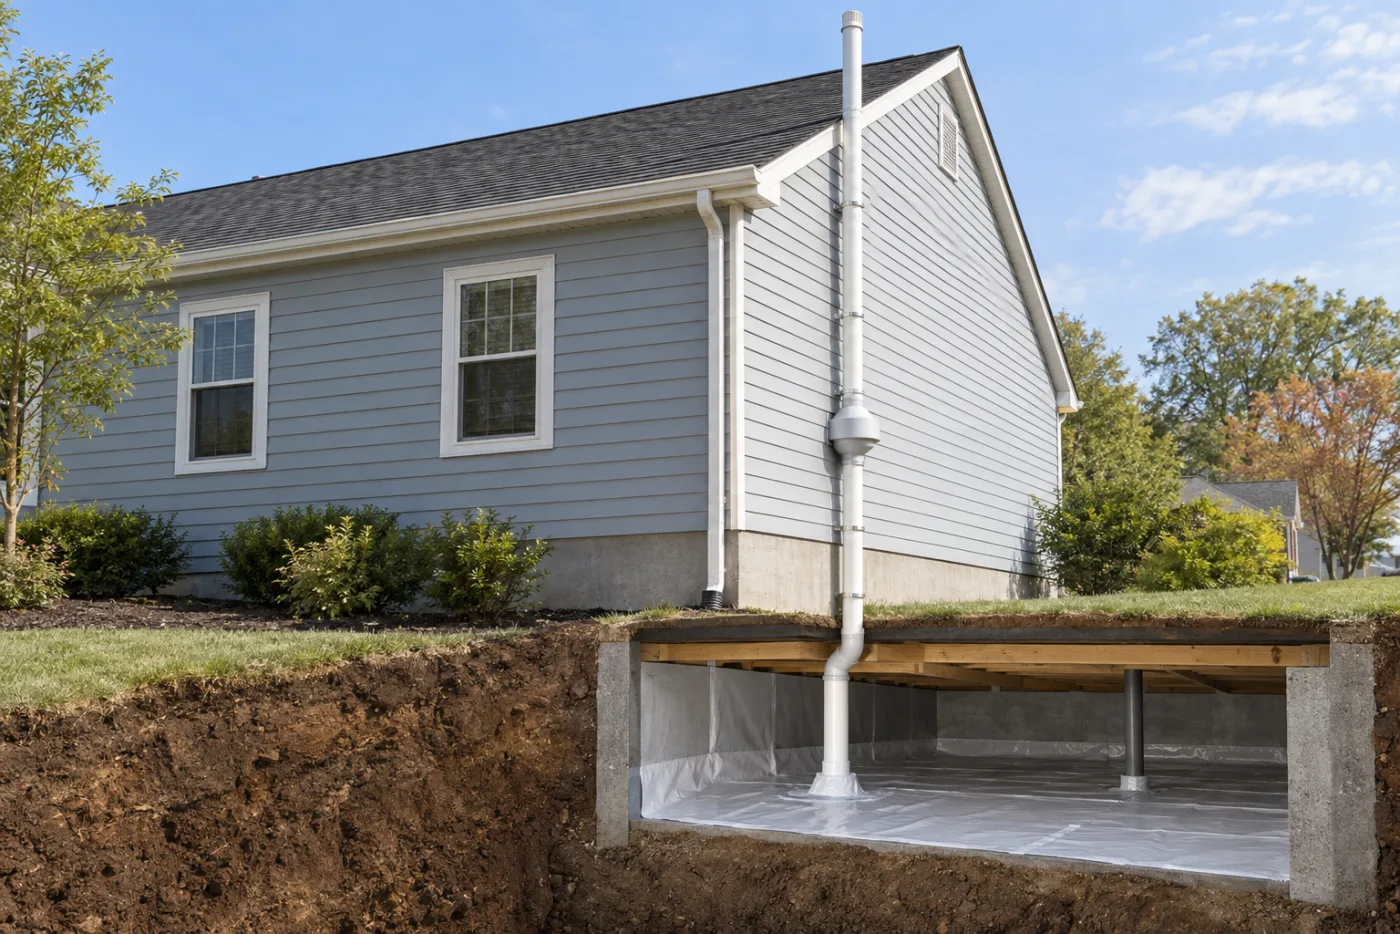
In many existing homes, active soil depressurization uses a pipe and fan to collect soil gas beneath the foundation and exhaust it outdoors. A crawl space may need a sealed membrane connected to the system. Homes with several foundation sections may require more than one suction point. Sealing cracks can help a system work, but caulk by itself should not be assumed to provide lasting radon control. Opening windows may temporarily change the reading, but it is not a dependable substitute for a permanent system.
Compare written scope, qualifications, and verification—not just the bottom-line price. Ask each contractor for:
Comparison example: Contractor A writes only “install one fan.” Contractor B separates the pressure diagnostic, two foundation sections, pipe route, outdoor exhaust point, system indicator, post-installation test, and warranties. Before selecting either quote, ask both companies to address the same checklist. Because every foundation and market is different, do not treat an unverified national average price as your budget. Obtain site-specific written estimates.
A radon fan and pipe should not interfere with other safety systems. Use the home fire escape plan checklist to review smoke and carbon-monoxide alarms and two exit routes from sleeping areas. A radon monitor is not a smoke alarm or a carbon-monoxide alarm; each risk requires its own equipment and response.
Review the lease, then ask the owner or property manager in writing for the latest report, test location, and mitigation maintenance history. Check whether approval is required before placing your own kit, and keep the original report and photos. Repair duties and timelines after a high result vary by jurisdiction, so confirm current requirements with your state, city, or county housing or health agency.
Base the test plan on the lowest occupied spaces tenants actually use. Keep the laboratory report and location record instead of sending only a text-message summary. In a multifamily building, do not infer every unit’s condition from one result; ask the state program or a qualified professional for an appropriate sampling plan. If a mitigation system is present, show tenants the system indicator and provide a maintenance contact.
A short transaction schedule makes a clear written protocol essential. The contract should address who selects the tester, how tampering is monitored, and what happens after a high reading—such as follow-up testing, mitigation, or another negotiated remedy. EPA recommends a qualified tester for a real-estate transaction. An existing fan is not proof of a current low level; review recent results and verify operation.
Yes. Radon can enter through slab cracks, utility penetrations, crawl spaces, and other openings. EPA recommends testing all homes. In a home without a basement, test the lowest occupied floor according to the kit instructions.
No. Even if the builder used radon-resistant features, measure the finished home under occupied conditions. Review construction documents to learn whether a passive vent can accept a fan if needed, but do not substitute that paperwork for a test.
You can test year-round. Seasonal conditions can affect results, which is why a short-term measurement is a snapshot and a long-term device can better represent the annual average. Avoid periods when extreme weather or construction makes it impossible to follow the kit instructions, or consult a professional.
No single decimal creates a completely safe side of a line. EPA and CDC guidance supports considering reduction between 2 and 4 pCi/L, and there is no known safe radon level. Review test quality, consider longer measurement, and discuss reasonable reduction options for the house.
Ventilation may lower a reading temporarily, but it depends on weather and occupant behavior and is not reliable as a permanent control. A qualified professional can design a durable system for the foundation.
Do not treat a typical air purifier as a replacement for radon mitigation. Proven approaches usually control soil gas before it enters and exhaust it outdoors through a building-specific design. Follow EPA and state-program guidance rather than a product claim.
No. Test after installation to verify performance, watch the system indicator, and follow the recommended retesting schedule. Fans are mechanical and electrical equipment and may eventually fail or require replacement.
Sump openings, foundation cracks, and crawl spaces can matter to both moisture management and radon entry. Never alter a radon pipe to solve a water problem. Document gutters, grading, and sump conditions with the fall home drainage checklist, then coordinate the radon, waterproofing, and plumbing scopes so one system does not compromise another.
브라우저 메뉴에서 앱 설치 또는 홈 화면에 추가를 선택해 주세요.
[…] Smartor 편집팀 September 16, 2026 Read this guide in English → […]